Terraform Enterprise/Cloud workspace types
Brendan Thompson • 17 March 2021 • 13 min read
Terraform Enterprise/Cloud (TFE/C) has three different ways of dealing with workspaces:
- VCS Backed - Workspaces are triggered and directly linked to a VCS repository
- API Driven - Triggered by an API call
- CLI Driven - Triggered by the use of the TF binary, which will essentially then hit the API
An example of what this selection process looks like in TFC can be seen below.
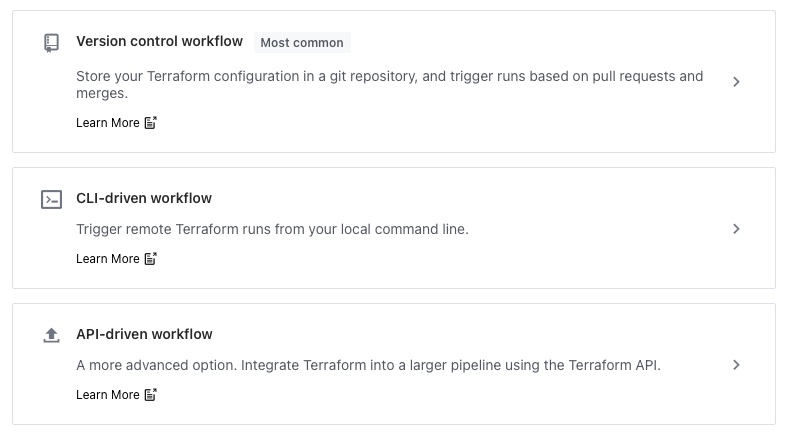
The most commonly used -for better, or worse- is the VCS backed workspace, it allows consumers to get kick started quickly and with a very low barrier to entry. However, it does not allow for a lot of flexibility when it comes to catering for more complex situations. When it comes to API/CLI driven workspaces they offer a significant increase in flexibility.
A standard approach for users when the workspace is VCS driven is to have multiple branches, directories, or even repositories. There are a few other ways you could skin this particular cat however the previously mentioned are the most common.
CLI-driven is a sensible choice when simply executing terraform plan, terraform apply is enough,
and this is usually going to be executed by some sort of orchestration tool, such as; Jenkins, Azure
DevOps.
The below diagram outlines the core components of a workspace, these components hold true for any type of TFE/C workspace.
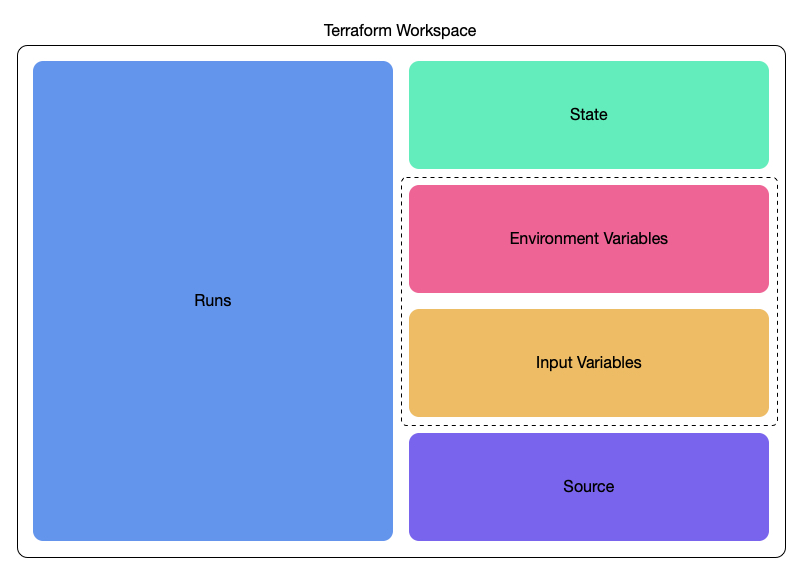
Just to delve into the details a little more about each of the components and what their function is.
- Runs – contains information about an execution of the terraform code, such as; version of the code used, terraform version, location of the run. A run includes both apply and plan.
- State - The various historical copies of state as well as the latest version. This is consumed by terraform runs.
- Variables - These come in two flavours, as such I have split them up:
- Environment - Variables that will be exported as environment variables on the runner, and consumed in that way.
- Input - Variables that can be consumed in the same way as passing in
-var=a=b, or a-var-file, this allows for complex variables to be passed in
- Source - The source of the terraform code, this is mostly important when considering VCS-driven workspaces as that is the only time this information is stored within the workspace.
Now that we have an understanding of the terraform workspace types and the components within them we can move to how we use these different workspace types.
VCS-driven Workspaces#
The easiest way to describe how the VCS-driven workspace works in my opinion is to step through setting one up.
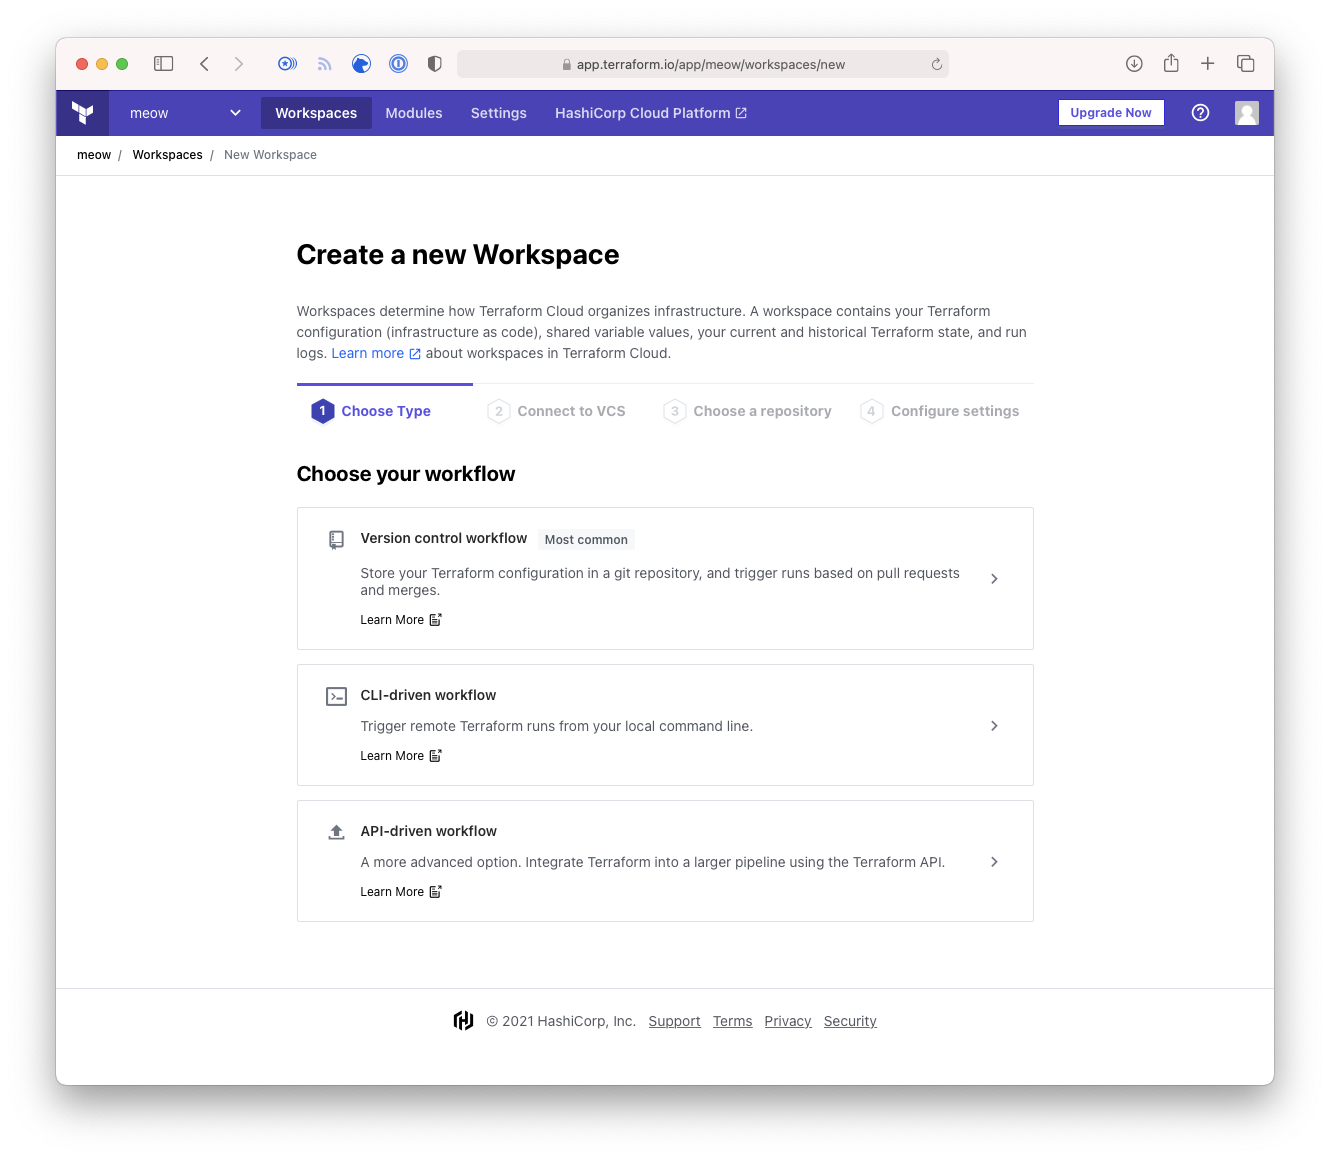
- Login to your Terraform instance. If you haven’t created any workspaces yet, or if you select
New Workspace then you’ll be presented with something like the following window. From here click
on Version control workflow as this workspace is going to be connected directly to a git repository.
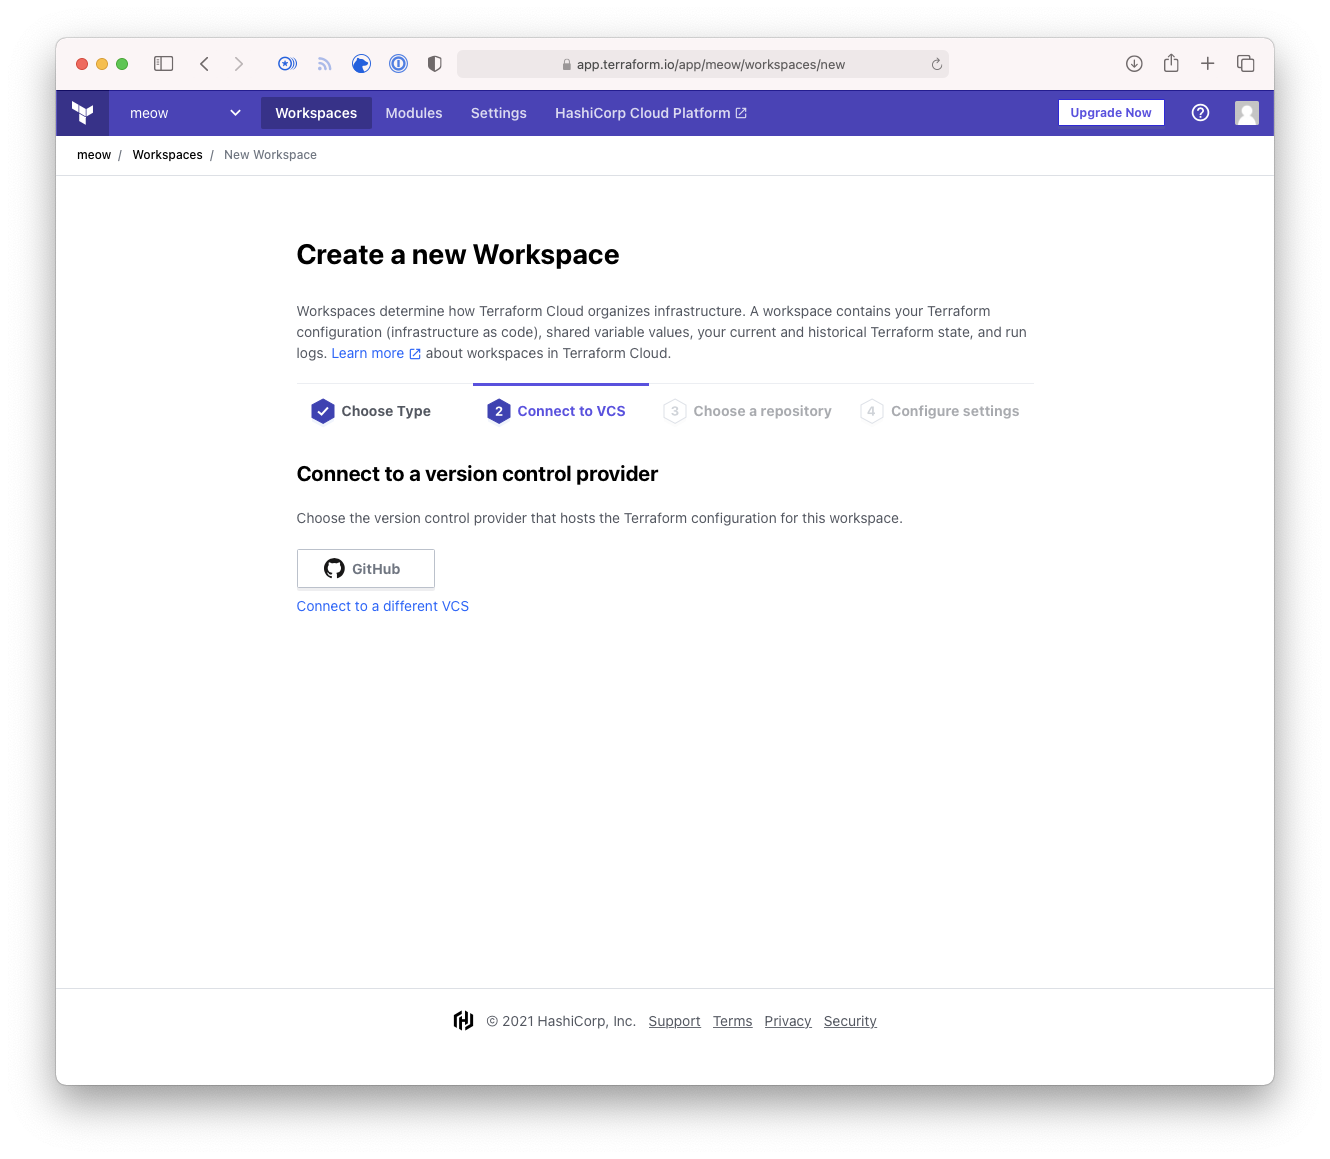
- You will either be presented with the option of a pre-configured VCS provider such as GitHub, or
the UI will present you with the option to configure your VCS provider. Click on which is relevant
to your situation.
- Select the repository that you wish the workspace to monitor for events. In this instance it is
a repository called
meow.
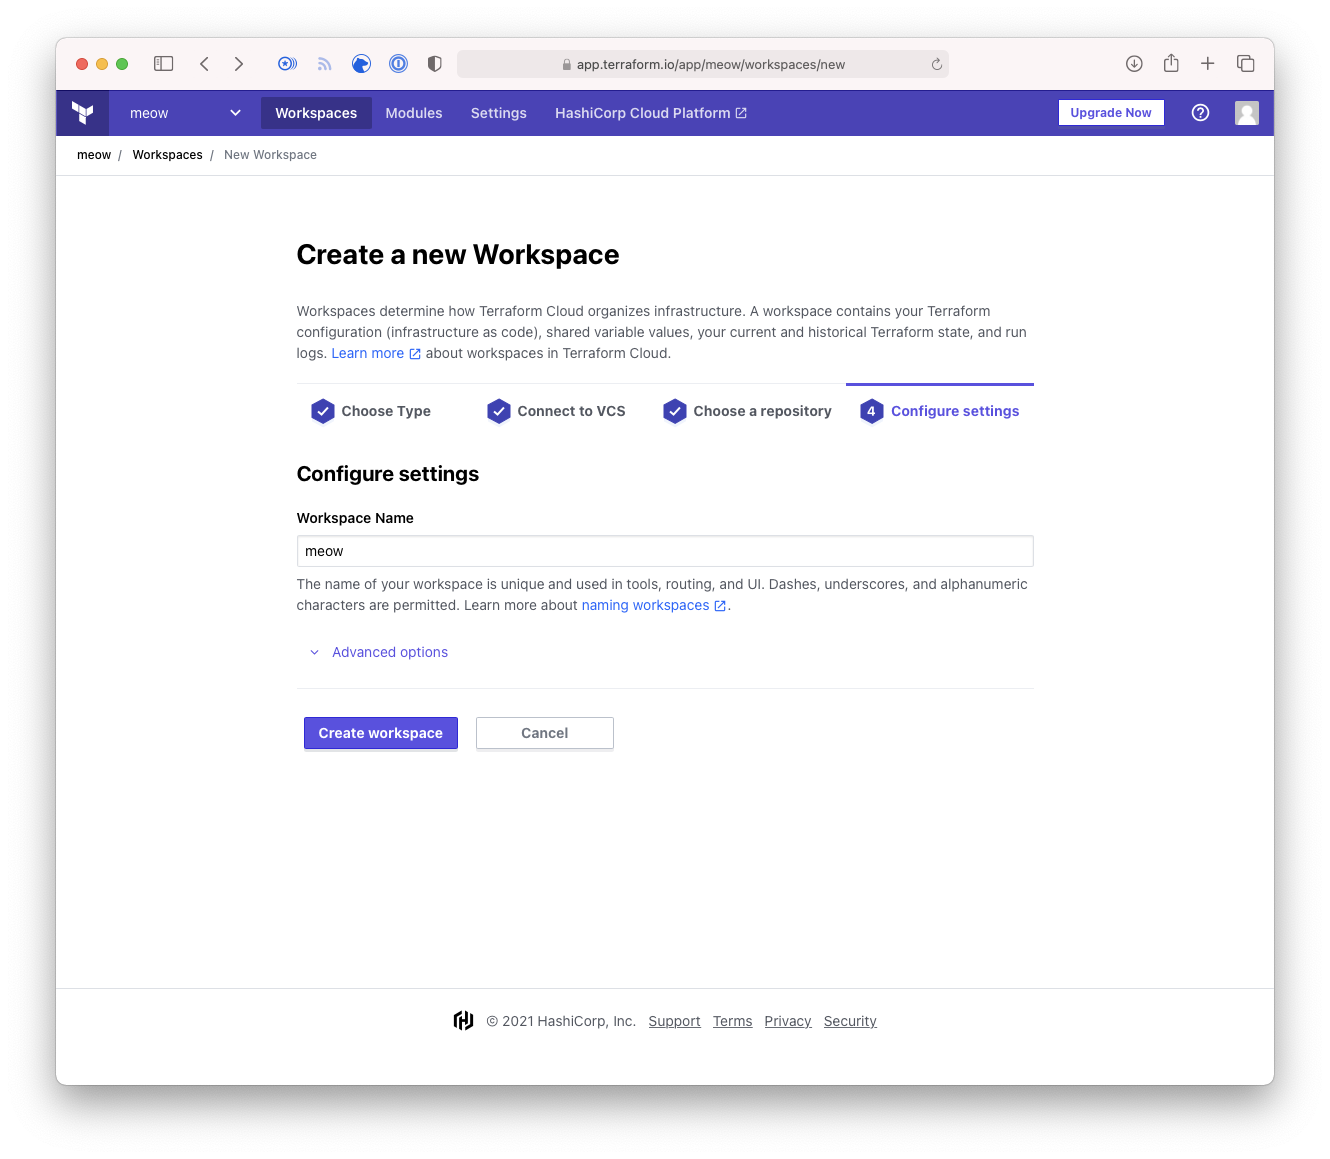
- Finally we are given the opportunity to configure some settings on the workspace, such as; which
branch to use, if Terraform should look for sub-modules etc. For the purposes of this exercise we will
just use the default as shown below.
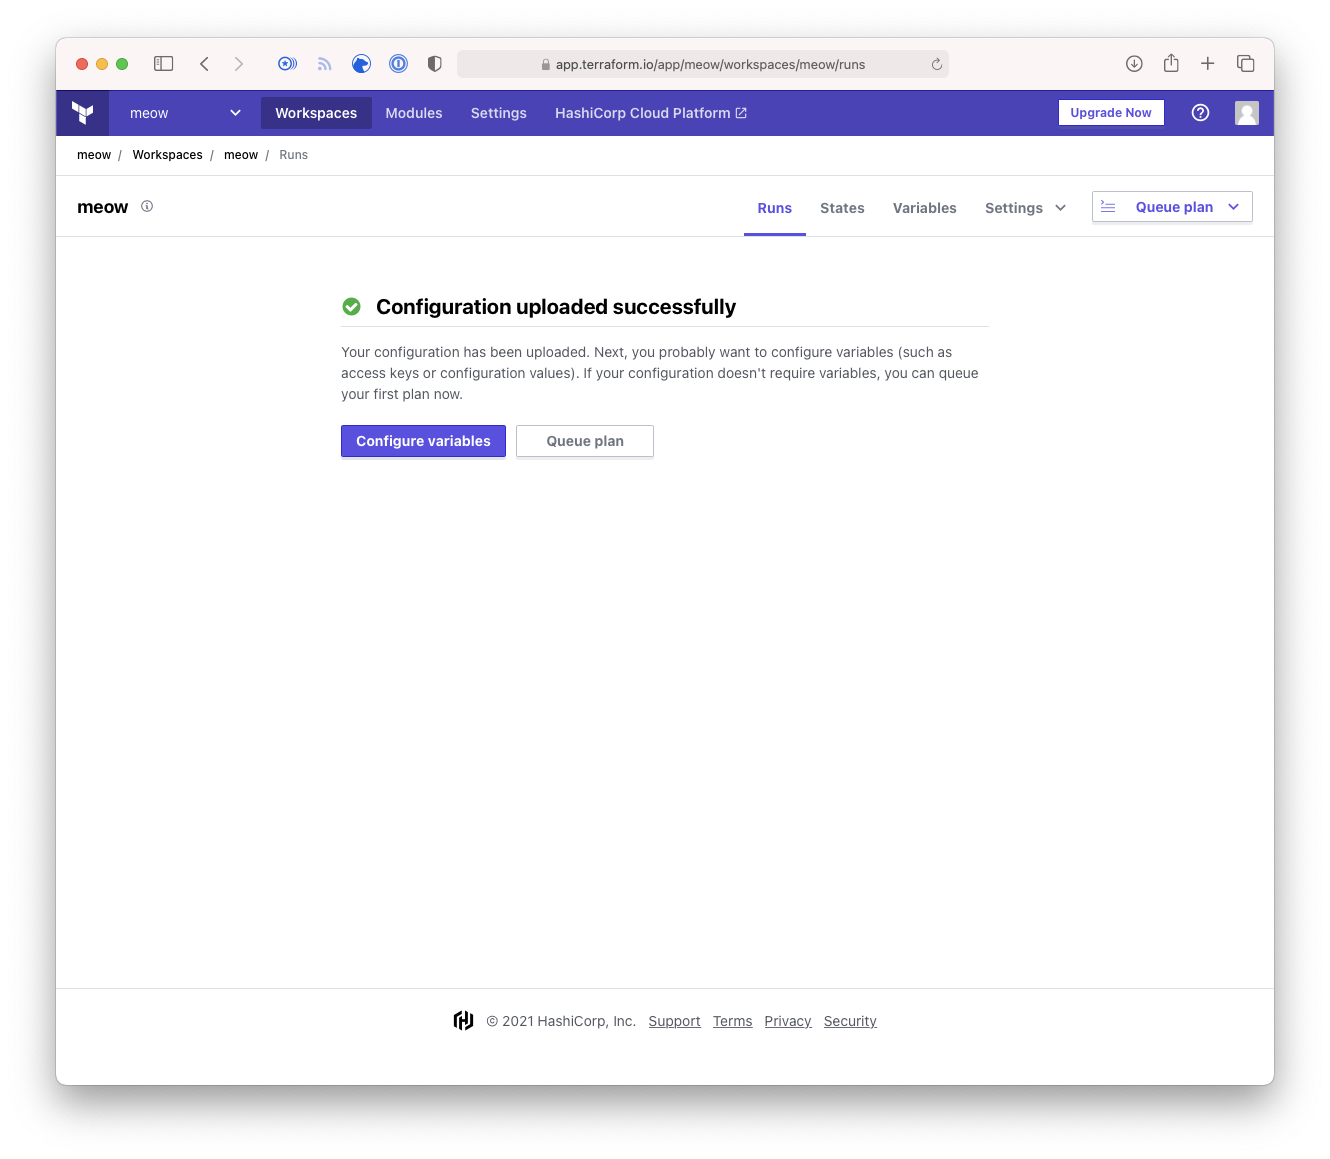
- Once the workspace is created you will be directed to the Runs screen, however as there have
likely been no runs on the workspace this screen will look like the below.
So, now we have ourselves a VCS-driven workspace. What this means is that any time there is an event
on the repository that we configured Terraform will auto-magically execute a terraform plan on the
workspace after checking out the latest version of the repository. Terraform has a special name for
these things, they are called configuration versions.
It should be noted that the nomenclature configuration versions is used for all workspace types,
although when it is in the context of VCS-driven there is a related and essentially undocumented
item called ingress attributes. These hold all the information about the repository, the commit and
author of a given commit.
Let us now make some assumptions. If we assume the following things:
- The consumer follows git-flow/GitHubFlow or another sensible branching model.
- Code ready to be deployed into an environment is within the
masterormainbranch.
If these hold true, then any time code is checked into that branch TFE/C will run a plan and an apply. However, it is still possible to manually queue a build, which I will demonstrate below.
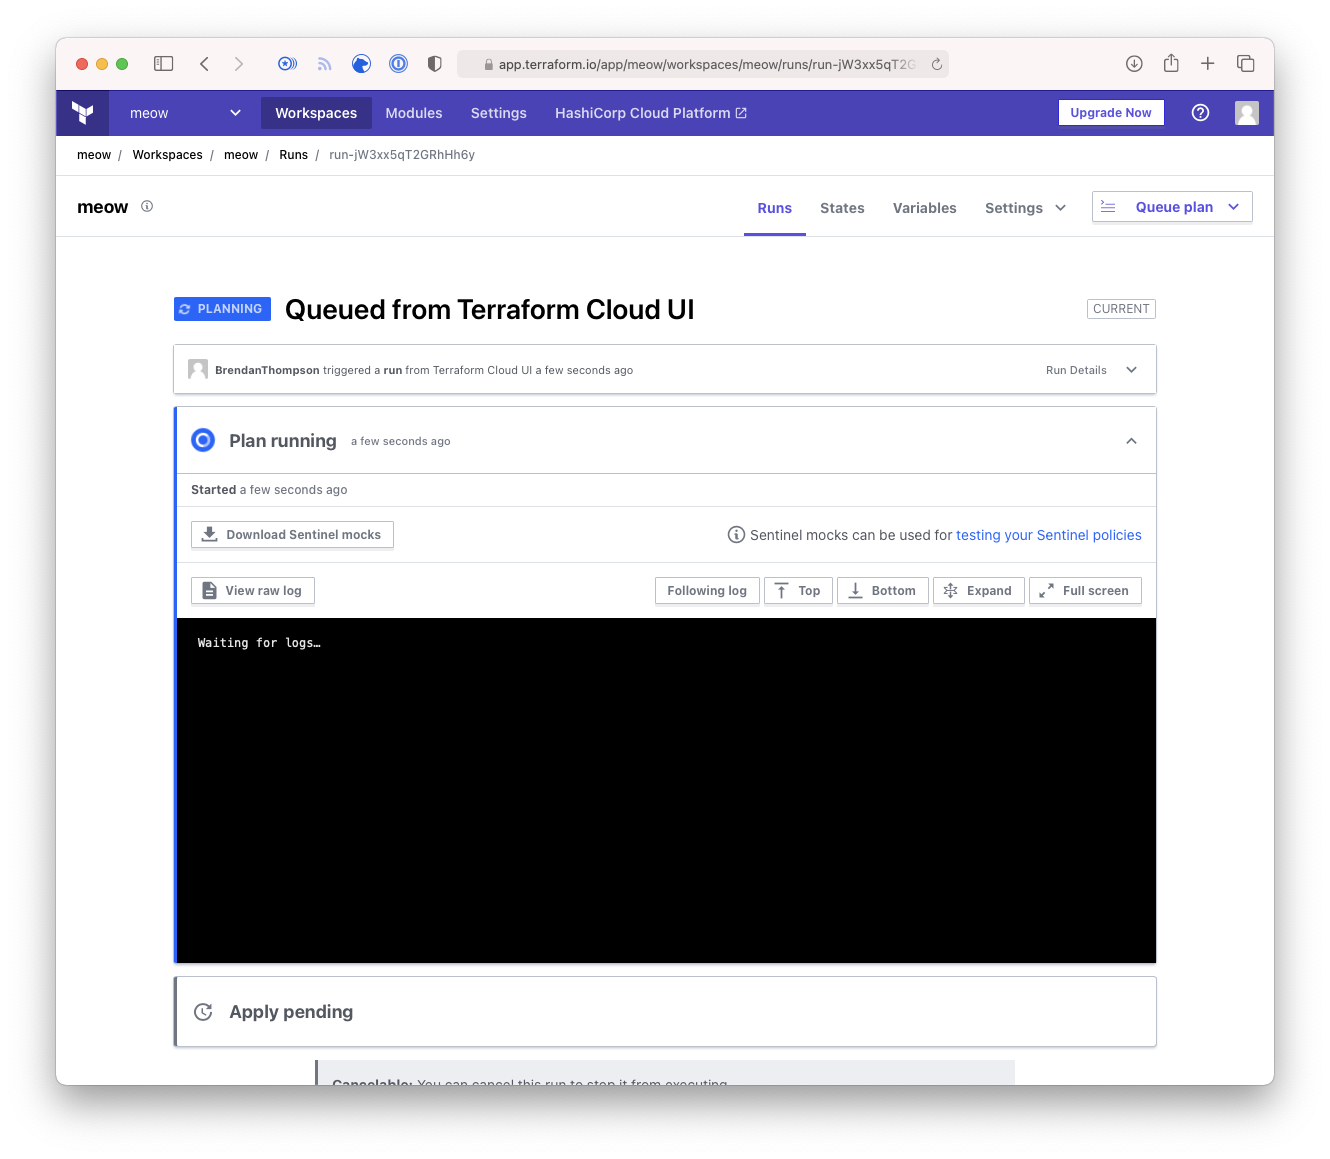
- Click on the Queue plan button where ever you may find it within your given workspace. This
will take you to a screen showing you information about a given run, in this instance it will show
the run as Planning.
- Once a Run has finished Planning in most scenarios it will prompt the user to Confirm
to allow it to Apply, this shows this.
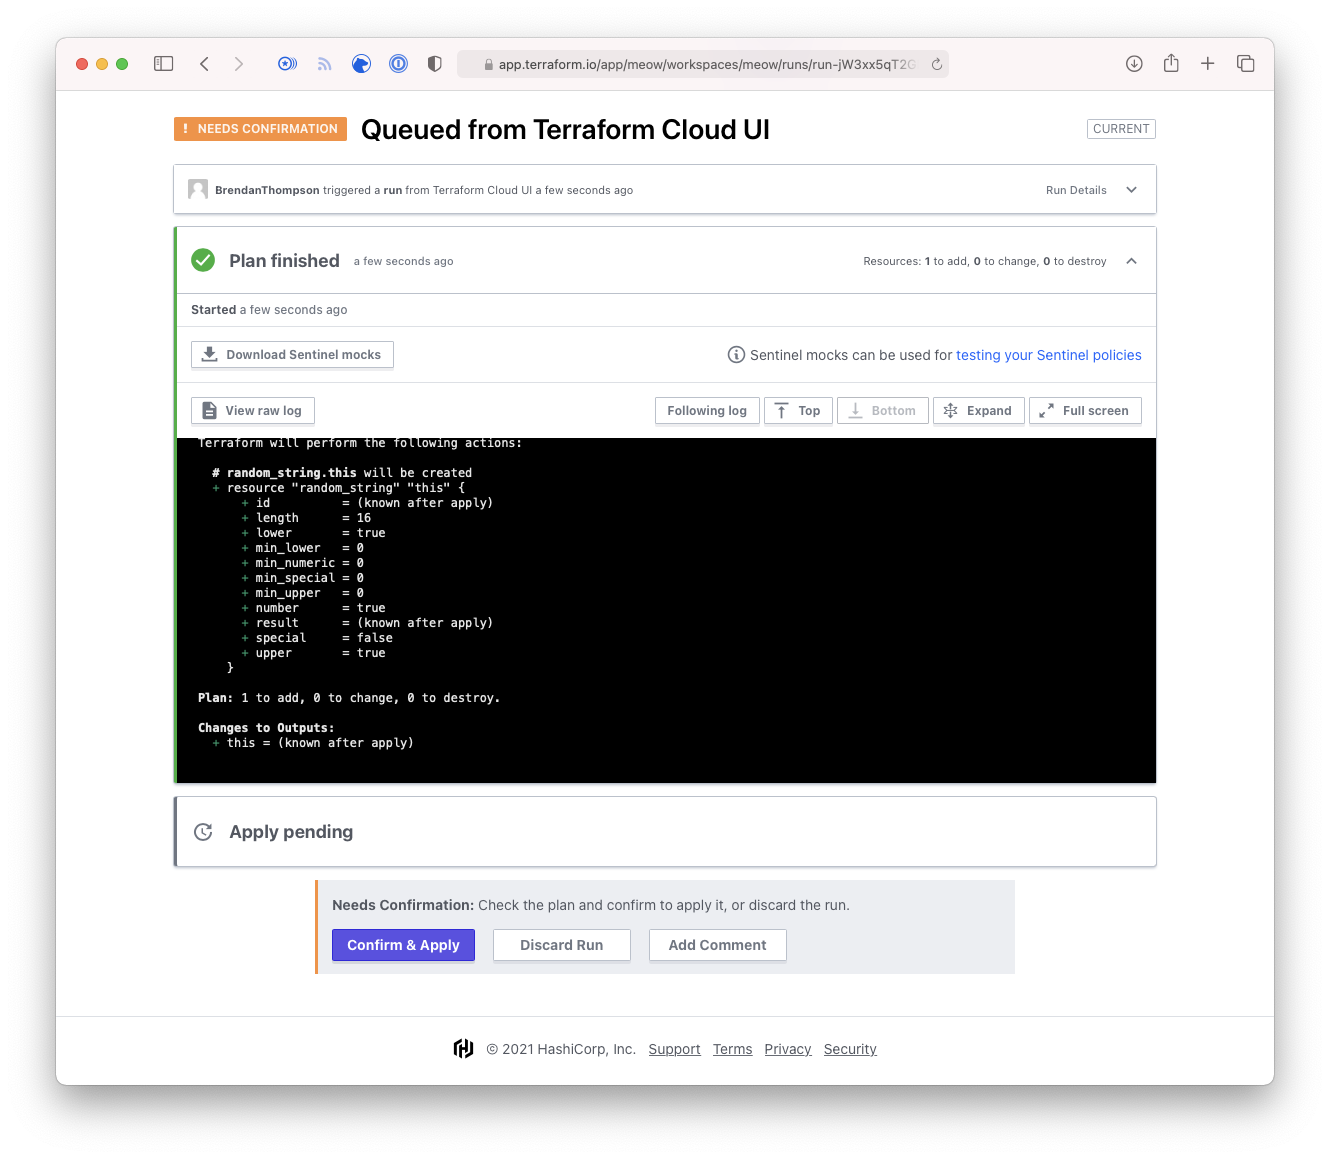
- Upon completion of the run TFE/C will give us an overview of the items added/deleted/changed during
that given run. As can be seen below, we created a
random_stringand output the result.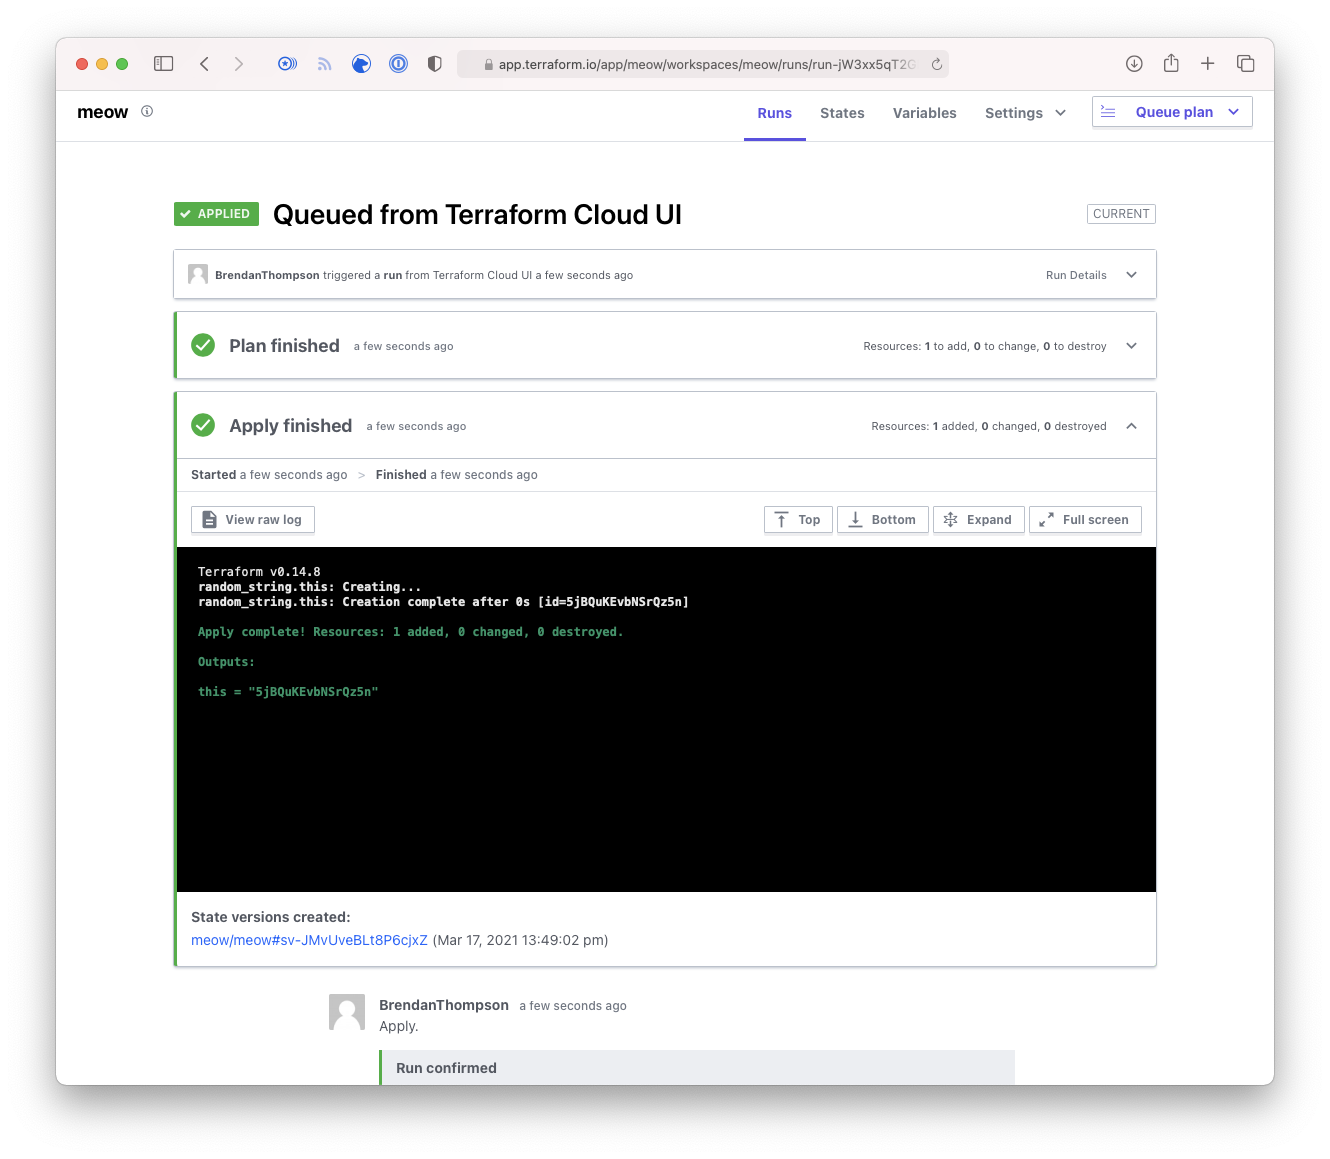
Hopefully this has shown some of the basics in terms of VCS-driven workspaces. They are limited in their flexibility, but they are exceptionally easy to work with.
API/CLI-driven Workspaces#
Now that you have a grasp on VCS-driven workspaces we will utilise some of that knowledge when working with API/CLI-driven. For the sake of my fingers I will now refer to these workspaces as API-driven.
I will run through the process of creating this particular workspace type just for the sake of consistency with VCS-driven.
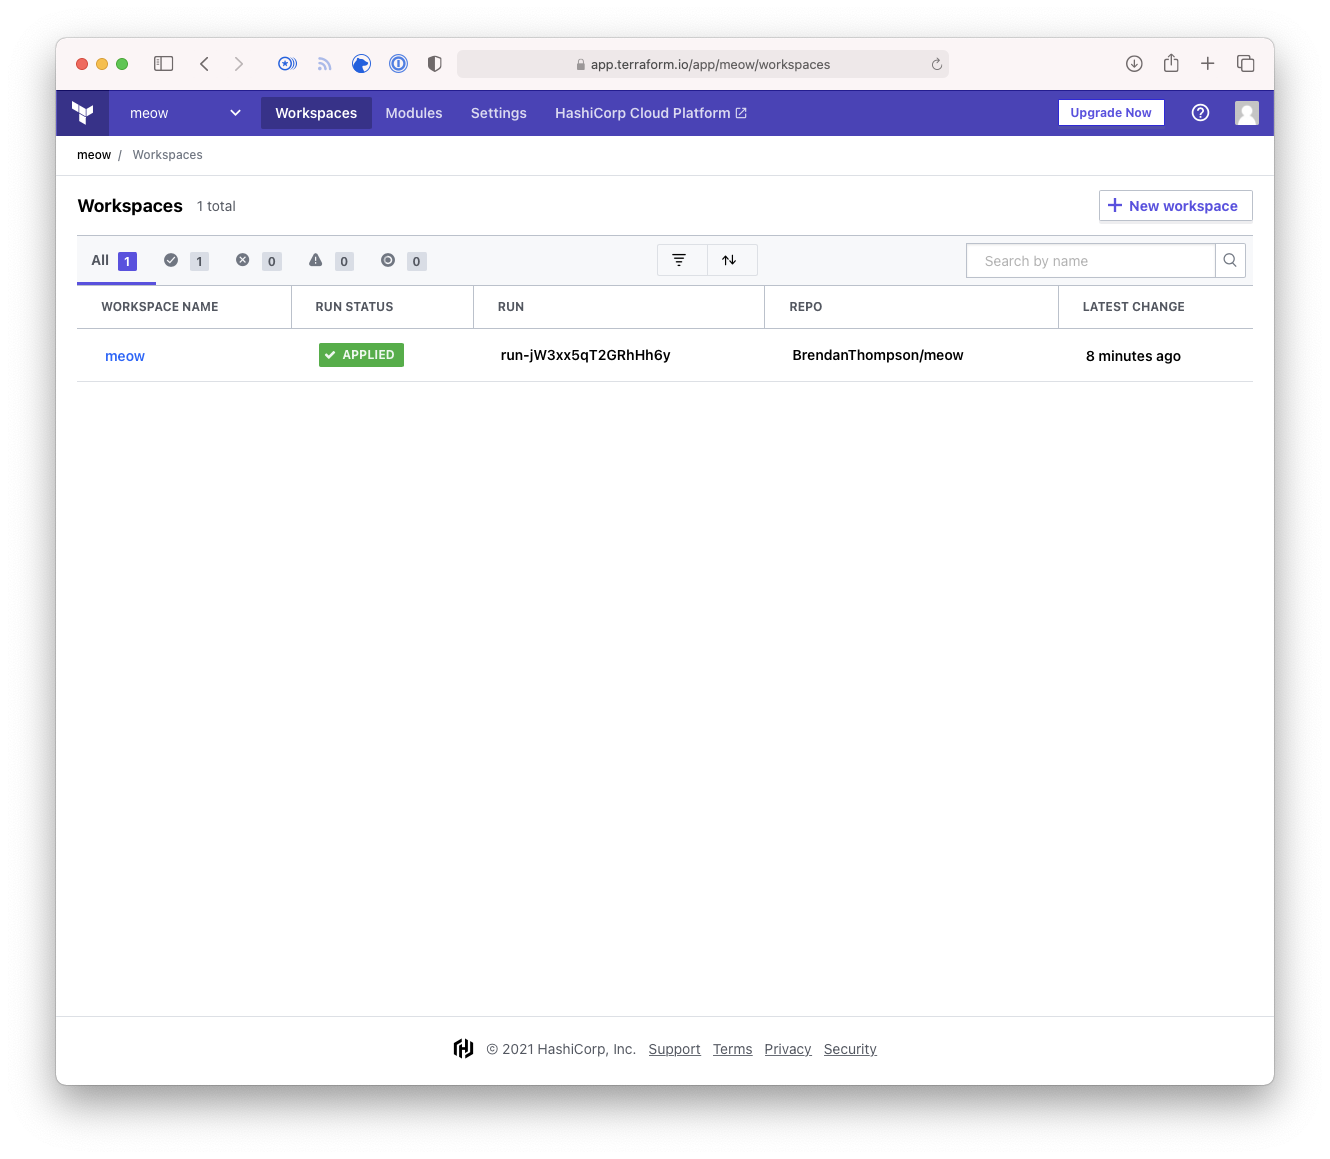
- From the Workspaces screen, click on Create workspace
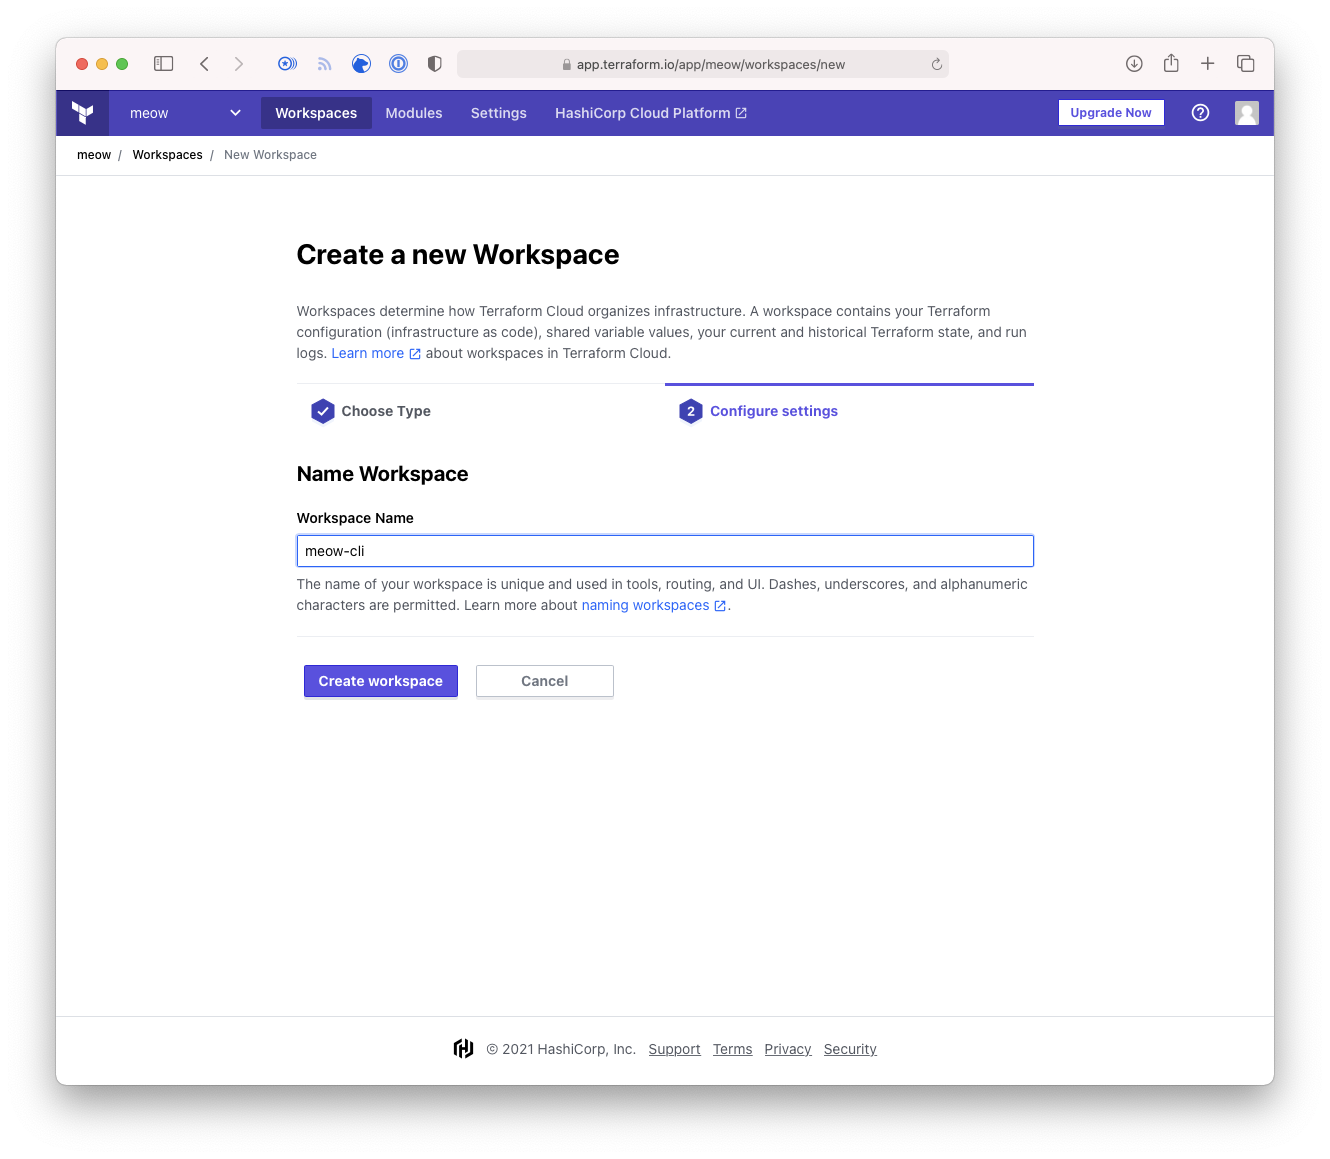
- At the workspace type selection page we will select CLI first, and then loop back around and
select API.
- Type in the desired name for your CLI-driven workspace, and click Create.
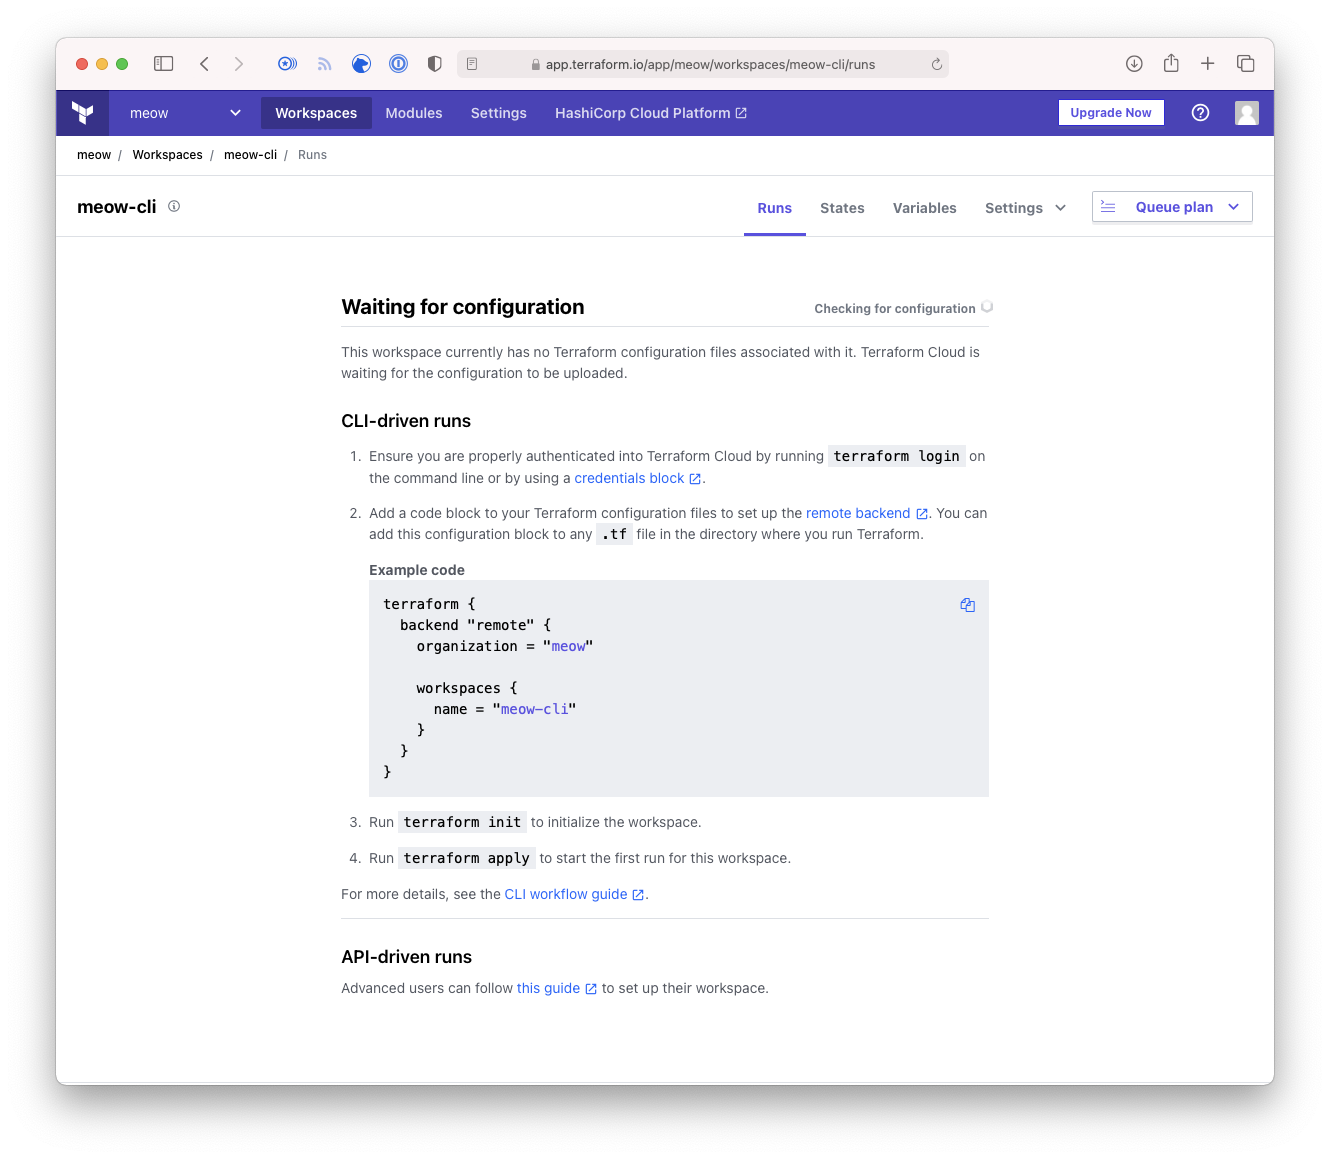
- This page is overview page showing how to configure the CLI-driven workspace.
- Type in the desired name for your API-driven workspace, and click Create.

- This page is overview page showing how to configure the API-driven workspace.

As you can see Step 3 is almost identical to Step 5, and the output shown in Step 4 is almost identical in Step 6. The only real difference here is the name of the workspace. This should prove out my statement from earlier around CLI-driven and API-driven as being essentially the same thing.
I won't really dig too much deeper into how one can use the Terraform CLI and an orchestration tool to drive the "CLI-driven" workspace as I feel it is fairly self-explanatory once we have gone through API-driven. If however someone disagrees and would like to see more details just reach out to me.
The real power of the API-driven workspace comes with the simple fact that you can control the workspace
and the code executed within the workspace using whatever language you are most comfortable with.
There are some scenarios where you might want to write some simple bash scripts to trigger the workspace,
or perhaps you want to write it all in Groovy if you're using Jenkins (and you're completely insane).
My preference however is always going to be to write your orchestration tool in go, which happens
to be my favorite programming language, at least for now.
So you can follow along at home we will continue to use our meow repository, the following snippet
shows the contents of our extremely complex Terraform code.
resource "random_string" "this" {
  length  = 16
  special = false
}

output "this" {
  value = random_string.this.result
}
Just to ensure that there is clear understanding here is a screenshot of what the file structure looks like within GitHub.
import (
    "context"
    "fmt"
    "os"
    "path/filepath"
    "time"

    tfe "github.com/hashicorp/go-tfe"
)

const (
    terraformExtension     = "tf"
    terraformEndpoint      = "https://app.terraform.io"
    terraformOrg           = "meow"
    terraformWorkspaceName = "meow-api"
    terraformToken         = ""
)
As you can see we are going to be operating within our meow-api workspace that was created earlier.
The first thing we need to do is generate a configuration version bundle, this is what gets uploaded into TFE/C and what the Plans and Runs are performed on. This example only works in your current working directory, however to extend this to be something actually useful would be very easy.
func GenerateConfigBundle(c *tfe.Client, ctx context.Context, org string, workspaceName string) (*tfe.ConfigurationVersion, error) {
    cwd, err := os.Getwd()
    if err != nil {
        return nil, err
    }

    ws, err := c.Workspaces.Read(ctx, org, workspaceName)
    if err != nil {
        return nil, err
    }

    configurationVersionOptions := tfe.ConfigurationVersionCreateOptions{
        AutoQueueRuns: tfe.Bool(false),
    }

    cv, err := c.ConfigurationVersions.Create(ctx, ws.ID, configurationVersionOptions)
    if err != nil {
        return nil, err
    }

    err = c.ConfigurationVersions.Upload(ctx, cv.UploadURL, cwd)
    if err != nil {
        return nil, err
    }

    for {
        cv, err := c.ConfigurationVersions.Read(ctx, cv.ID)
        if err != nil {
            return nil, err
        }

        switch cv.Status {
        case tfe.ConfigurationUploaded:
            return cv, nil
        case tfe.ConfigurationErrored:
            return nil, fmt.Errorf("Config upload error")
        }

        time.Sleep(1 * time.Second)
    }
}
Once we have a Configuration Version sitting in TFE/C for us to execute on we will need to run a plan. This next function creates a plan for our given workspace.
func RunPlan(c *tfe.Client, ctx context.Context, org string, workspaceName string, cv *tfe.ConfigurationVersion) (runID string, err error) {
    ws, err := c.Workspaces.Read(ctx, org, workspaceName)
    if err != nil {
        return "", err
    }

    runOptions := tfe.RunCreateOptions{
        Message:              tfe.String("Plan created by API."),
        ConfigurationVersion: cv,
        Workspace:            ws,
    }

    r, err := c.Runs.Create(ctx, runOptions)
    if err != nil {
        return "", err
    }

    for {
        r, err := c.Runs.Read(ctx, r.ID)
        if err != nil {
            return "", err
        }

        switch r.Status {
        case tfe.RunPlanned, tfe.RunPlannedAndFinished:
            return r.ID, nil
        case tfe.RunCanceled:
            return "", fmt.Errorf("Plan was cancelled.")
        }

        time.Sleep(1 * time.Second)
    }
}
From the plan we would then be able to perform validations etc or do any data manipulation you could think of, and that's part of the power of the API. In this example however we won't go into any business logic code.
So, now that the plan run is sitting there and good to go we can now execute the Apply, which is done by the following function:
func ApplyPlan(c *tfe.Client, ctx context.Context, runID string) (string, error) {
    opts := tfe.RunApplyOptions{
        Comment: tfe.String("Plan applied by API."),
    }

    err := c.Runs.Apply(ctx, runID, opts)
    if err != nil {
        return "", err
    }

    for {
        r, err := c.Runs.Read(ctx, runID)
        if err != nil {
            return "", err
        }

        switch r.Status {
        case tfe.RunApplied:
            return r.ID, nil
        case tfe.RunCanceled:
            return "", fmt.Errorf("Apply was cancelled.")
        case tfe.RunErrored:
            return "", fmt.Errorf("Apply has errored.")
        }

        time.Sleep(1 * time.Second)
    }
}
The Apply will return a runID if it was successful, and we could use that runID to perform
some other business logic. There is however another scenario where we might want to discard a run,
this would be done on the Plan and it would be done with the following func.
func DiscardPlan(c *tfe.Client, ctx context.Context, runID string) error {
    opts := tfe.RunDiscardOptions{
        Comment: tfe.String("Run discarded by API."),
    }

    err := c.Runs.Discard(ctx, runID, opts)
    if err != nil {
        return err
    }

    for {
        r, err := c.Runs.Read(ctx, runID)
        if err != nil {
            return err
        }

        switch r.Status {
        case tfe.RunDiscarded:
            return nil
        }

        time.Sleep(1 * time.Second)
    }
}
Finally we need to tie this all together, in this example we are just going to tie this together
within our func main() {}. In reality this would be laid out in a more efficient and sensible way.
func main() {
    ctx := context.Background()
    config := &tfe.Config{
        Address: terraformEndpoint,
        Token:   terraformToken,
    }

    c, err := tfe.NewClient(config)
    if err != nil {
        panic(err)
    }

    cv, err := GenerateConfigBundle(c, ctx, terraformOrg, terraformWorkspaceName)
    if err != nil {
        panic(err)
    }

    runID, err := RunPlan(c, ctx, terraformOrg, terraformWorkspaceName, cv)
    if err != nil {
        panic(err)
    }

    fmt.Println(runID)

    runID, err = ApplyPlan(c, ctx, runID)
    if err != nil {
        panic(err)
    }

    fmt.Println(runID)

}
What can be seen here is we are setting up our tfe.Client which is then being passed around to all
our other functions. Then we need to generate our Configuration Version bundle through the GenerateConfigBundle()
func, then we run the plan RunPlan(), and finally we apply that run with the ApplyPlan() function.
Final Thoughts#
There you have it, we have taken a look at the different types of workspaces that are available to us within Terraform Enterprise and Terraform Cloud. As has been demonstrated there is the potential for extreme power and flexibility with the API-driven workspaces as you have the power of whatever programming language you are more comfortable in. You can put in any business logic that fits your scenario and that is just something that is unfathomably useful!