Kubernetes in Space - Azure
Brendan Thompson • 21 April 2021 • 11 min read
This is the first installment of a 3 (potentially 4) part series around deploying Kubernetes (k8s) to the major public clouds, the other posts will show how to deploy k8s on GCP and AWS. Once they've been posted I will update this post to ensure there are links out to those articles.
The first part of the blog post "Kubernetes in Space" is a little clickbaity but it is just something that resonates with me at the moment. There is a lot of drive with Cloud Native technology and consuming public clouds native PaaS offerings and I think we are losing some of the joy and certainly flexibility when it comes to consuming those. As a solution to this I personally prefer to use k8s where ever possible. It does, however, raise some other problems wherein organizations occasionally will try and push really nasty old COTS applications into k8s, which for anyway who has spent any time doing this knows that seldom does that work out well.
Enough of my ranting, and on with the post.
Table of ContentsDesign#
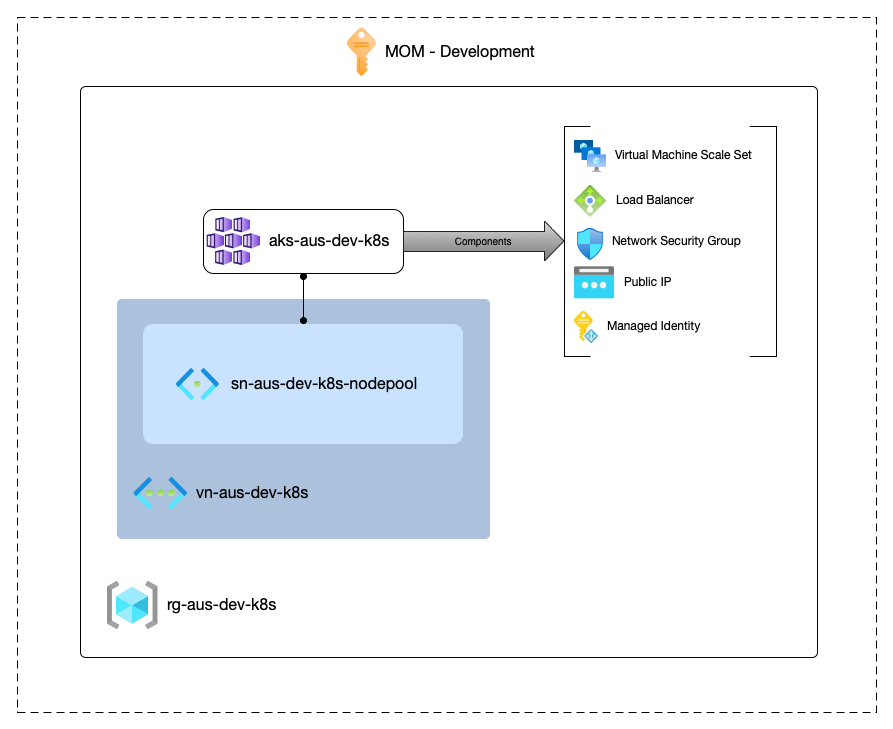
Before we can learn how to deploy k8s, or in Azure's instance Azure Kubernetes Services (AKS) we must first understand the requirements, and components that are involved with deploying this service.
At a very high level the below is a list of things that are required in order to deploy AKS.
- Azure Subscription
- Resource Group
- Virtual Network
- Subnet
When AKS itself is deployed it will created a managed resource group in which the clusters resources will be deployed, those resources are:
- Virtual machine scale-set
- Load balancer - this can be internal or external
- Network security group
This below diagram shows each of the components discussed above, and where they sit within Azure.
It is also important to note that there are different types of AKS clusters, they are as follows:
- Public AKS cluster - The master node is accessible publicly via a public DNS record.
- Private AKS cluster - The master node is accessible by an internal DNS record through the use of Azure Private Link.
Infrastructure as Code#
Now that we have an understanding of how AKS works -at a high level- on Azure we can begin our journey into deploying it, the first step being to write the infrastructure as code (IAC).
I will organize this section into each of the terraform files that we will create in order to deploy the cluster. In the below code fence is a tree of the files that we are going to be looking at.
.
├── backend.tf
├── main.tf
├── network.tf
├── providers.tf
└── variables.tf
main.tf, variables.tf, and outputs.tf files I personally recommend splitting the code out into logical files. This ensures that when you're looking for a particular thing, say network resources it is easy to identify where that code is.Further, it allows for some more advanced code ownership rules when it comes to GitHub and/or CI/CD.
1. Backend#
The backend is the terraform file that instructs terraform which workspace and TFE/C instance to store state in.
terraform {
  backend "remote" {
    organization = "ministry-of-magic"

    workspaces {
      name = "k8s-azure"
    }
  }
}
As can be seen above we are working with the ministry-of-magic Terraform Cloud instance, and our
workspace is called k8s-azure.
2. Providers#
The providers.tf file is where we store our requirements for the providers we are going to be
consuming with the rest of our terraform code. I have opted to keep in the Service Principal details
just to demonstrate which fields are going to be required.
terraform {
  required_providers {
    azurerm = {
      source  = "hashicorp/azurerm"
      version = "=2.56.0"
    }
  }
}

provider "azurerm" {
  features {}

  subscription_id = ""
  client_id       = ""
  client_secret   = var.client_secret
  tenant_id       = ""
}
There are two key sections within this file:
terraform { required_providers {} }- Defines the providers that are going to be used within the code and any constraints around required versions for the providers that are going to be used. As can be seen above we are going to be consuming theazurermprovider, and we are constraining it to consume the2.52.0version of the provider.provider "azurerm {}- Configures the provider itself, in this instance we are passing in the authentication details, as well as a required field calledfeatureswith an empty map.
One additional point here is that on the marked line we are consuming a variable to get the value
for the client_secret. Depending on how you decide to configure the provider using the variable
here might be redundant. The azurerm provider allows for all of its authentication details to be
passed in as environment variables, meaning that this can simply set on the workspace itself.
3. Variables#
The variables.tf file is where the input variables that are required for the code to execute are
to be defined.
variable "client_secret" {
  type        = string
  description = "Azure service principal client secret"
}

variable "environment" {
  type        = string
  description = "The environment the resources are deployed to"
  default     = "dev"

  validation {
    condition     = can(regex("", var.environment))
    error_message = "Supplied environment does not allowed values."
  }
}
We are declaring two input variables:
client_secret- The client secret value that is to be consumed by the provider block.environment- An environment so that we can potentially create logic that will deploy things in different ways depending on if it's a production deployment or not. It is important to note that the highlighted lines in the variables file are to validate that the value we pass in for the variable matches a given regex. Further to this we have also set a default value for this input variable meaning that it is optional to be passed in at runtime.
4. Network#
The network.tf is where we will declare all the networking components. For such a simple
deployment of AKS we will only be describing two resources.
resource "azurerm_virtual_network" "this" {
  name                = format("vn-aus-%s-k8s", var.environment)
  resource_group_name = azurerm_resource_group.this.name
  location            = azurerm_resource_group.this.location
  address_space       = ["10.0.0.0/23"]

  tags = {
    environment = var.environment
  }
}

resource "azurerm_subnet" "node_pool" {
  name                 = format("sn-aus-%s-k8s-nodepool", var.environment)
  resource_group_name  = azurerm_resource_group.this.name
  virtual_network_name = azurerm_virtual_network.this.name
  address_prefixes     = ["10.0.0.0/24"]
}
As stated previously in this file we are only talking about two resources, they are:
azurerm_virtual_network- The virtual network (vnet) where our AKS cluster will exist, the reason we are having to define this is because we will be deploy a CNI enabled AKS cluster. Note we have tagged this resource with the environment.azurerm_subnet- The subnet that the cluster's network resources will attach to.
5. Main#
main.tf is where all the juicy stuff lives, although due to the simplicity of this deployment
it is only going to be two resources.
resource "azurerm_resource_group" "this" {
  name     = format("rg-aus-%s-k8s", var.environment)
  location = "australiasoutheast"

  tags = {
    environment = var.environment
  }
}

resource "azurerm_kubernetes_cluster" "this" {
  name                = format("aks-aus-%s-k8s", var.environment)
  resource_group_name = azurerm_resource_group.this.name
  location            = azurerm_resource_group.this.location
  dns_prefix          = "blt"
  node_resource_group = format("%s-aks", azurerm_resource_group.this.name)

  default_node_pool {
    name           = "default"
    node_count     = 1
    vm_size        = "Standard_D2_v2"
    vnet_subnet_id = azurerm_subnet.node_pool.id
  }

  identity {
    type = "SystemAssigned"
  }

  network_profile {
    network_plugin     = "azure"
    network_policy     = "calico"
    service_cidr       = "192.168.0.0/21"
    dns_service_ip     = "192.168.0.10"
    docker_bridge_cidr = "192.168.100.0/21"
  }

  addon_profile {
    kube_dashboard {
      enabled = false
    }
  }

  tags = {
    environment = var.environment
  }
}
The two resources we are going to be working with are:
azurerm_resource_group- Where all of the resources we define are going to live within our Azure subscription.azurerm_kubernetes_cluster- The actual AKS cluster; this also contains our node pool, which are the kubernetes worker nodes. I will go through each of the component blocks in more detail below:default_node_pool- The default worker node pool, this is where we tell the AKS resource which vnet to deploy the worker nodes into, as well as the size of the cluster and its IaaS instances.identity- The identity the cluster is going to use when authenticating back with Azure, in this instance we are going to be usingSystemAssignedother options here areUserAssignedandService Principal.network_profile- This describes the internal networking components for the cluster, such as; the network plugin, network policy and the internal ranges that are used.InfoWhen you're using a cluster that is CNI enabled it is important to check that the network range does not overlap with the internal cluster networks. If it does you will need to be explicit about which ranges the cluster should use as we have done above.addon_profile- This allows us to configure things such as logging back to log analytics, the monitoring profile, and of course if the kubernetes dashboard should be enabled.tags- The tags we want to assign to the cluster as well as the resources provisioned by theazurerm_kubernetes_clusterresource itself.
Deployment#
Now that we have all our IAC together we can put that all together and deploy ourselves a sweet AKS cluster. This process is pretty straight forward!
In the example I have opted to use an API-driven workspace as this will give the flexibility I need/want to kick this off quickly.
From where ever your terraform code is residing you will need to run the basic terraform commands as follows:
- First we must initialize our working directory
terraform init
- Now we will quick of a plan to make sure everything looks the way we are expecting it to
terraform plan
- After reviewing the plan to ensure that it looks correct we will apply the run
terraform apply
When prompted to ensure to confirm the apply so that the resources themselves are built.
Once everything is green from your terminal we can go and checkout the cluster in the portal. From your subscriptions resource group view you should see something similar to the below:
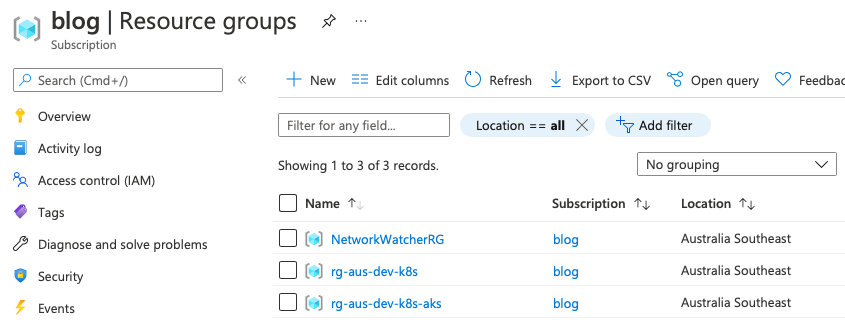
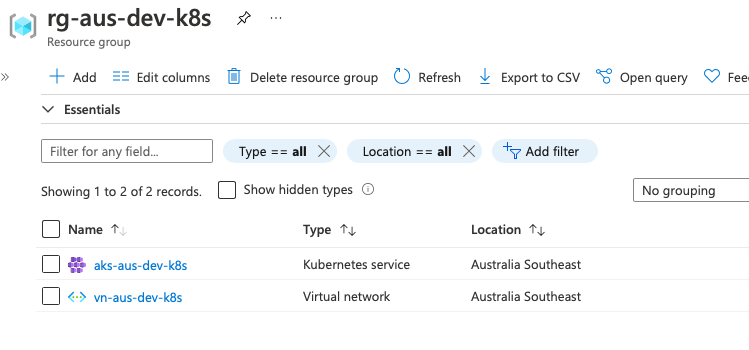
As you can see we have three resource groups, the first is an Azure special one for monitoring the networks the other two are the ones that we created through our code! Now we have ourselves an AKS cluster in our subscription. Lets go dig into the two resource groups. This first image shows the contents of the resource group we actually created through our IAC, it contains -as we expect- two resources; an AKS cluster, and a Virtual Network.
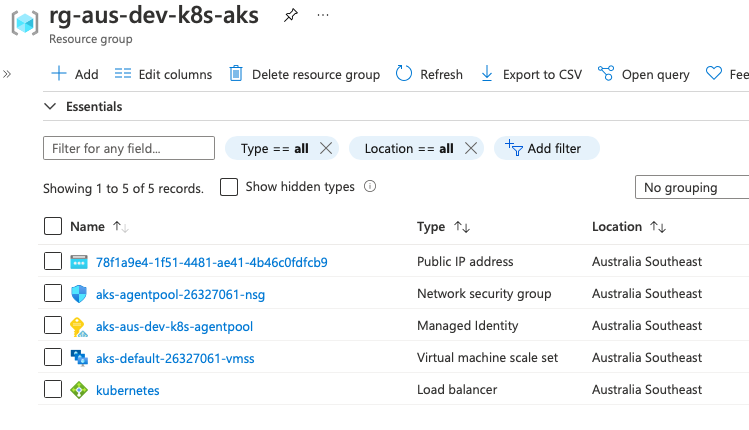
The second resource is the managed resource group, this is what is created by the AKS resource itself and managed by Microsoft. It is absolute best practice not to touch anything within the RG.
Now that all our resources have been deployed by TFE/C it will now be possible to deploy your containerised workloads into the AKS cluster.
Closing Thoughts#
Hopefully this first post has given some insight into how simple it is to deploy managed kubernetes clusters to Azure. It wasn't always this way either, Azure has had rather a few pittfalls when it came to Azure but they are steadily improving there offering and getting pretty close to their primary competitors.
If your organisation is running in Azure and you're looking for to use kubernetes, I would say that it is well worth checking out AKS as long as you do not have the requirement for fully private clusters. Microsoft's private link solution I feel is still rather brittle I hope its something they invest some more time into as it will make the offer far more compelling for larger and/or regulated organizations.
If there are any gaps, or anything further you'd like me to touch on please feel free to reach out.